고온형 열팽창율 및 열팽창계수측정기 (딜라토미터)
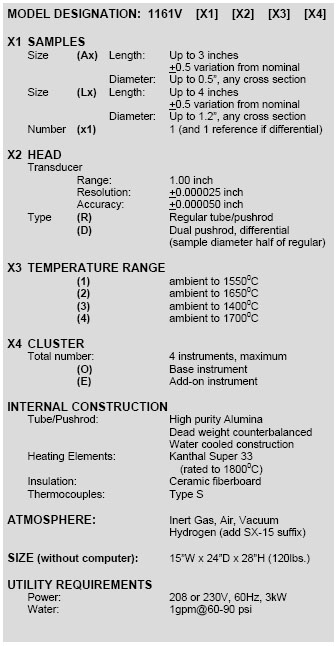
UNITHERM ™ 1161V
▣ HIGH TEMPERATURE VERTICAL DILATOMETER
▣ Ambient to 1650 °C
▣ Single or dual sample
▣ Research quality
▣ Vertical model for sintering studies
▣ Vacuum, inert and hydrogen atmospheres
▣ ASTM
Unitherm™ Model 1161V is a fully computerized dilatometer system designed to measure dimensional changes of a specimen brought about by changes in its thermal environment. Linear thermal expansion coefficient, shrinkage attendant to sintering, phase transformations, annealing characteristics, and other physical or chemical changes manifesting themselves in a change of a linear dimension can be precisely determined. Studies of processing parameters as reflected by dimensional changes of the material can be studied in great detail through duplication of thermal cycles and rates used in the actual process. Due to the extensive programming available to produce thermal cycles, complex processes can easily be simulated.
A high temperature furnace is constructed of low thermal mass fibrous alumina insulation surrounding molybdenum disilicide heating elements. Four hairpin shaped elements act as eight linear heat sources equally spaced around the muffle tube (parallel to its axis). Length-to-diameter ratios are chosen to ensure excellent hot zone uniformity. The digital displacement transducer used in the system is an absolute device with no periodic calibration requirements. It is free of short term drift and long term changes, as its accuracy is based on a very stable internal glass grating whose movement is optically monitored.
The vertical configuration of this instrument makes it especially suitable for testing ceramic materials where shrinkage often outweighs expansion. In a horizontal sample holder, shrinkage of a sample can cause it to pull away from the end plug, resulting in erroneous data. Vertical configurations are not subject to this problem. Pushrod tracking forces are governed by variable dead weight counter-balancing, and can be reduced to very low values. Optionally, specific pushrod loading can also be applied through additional weights on a pan to operate it as a Thermo-Mechanical Analyzer (TMA). Optional program modules allow softening point determination and controlled rate sintering cycles.
• Ambient to 1650 °C
• Single or dual sample
• Research quality
• Vertical model for sintering studies
• Vacuum, inert and hydrogen atmospheres
• ASTM
The dilatometer head slides vertically on guide rods to extract the sample holder (dilatometer tube) from the furnace cavity. The smoothly functioning, head-lifting mechanism is counter-balanced with constant force springs. When inserted, sliding hermetic seals engage the muffle tube collar to provide a protective environment for the specimen. Critical components, such as the ends of the muffle tube and the seals engaging it, along with the base of the dilatometer head, are water cooled.
The standard alumina dilatometer tube and pushrod are readily interchangeable with a fused silica assembly. System correction for the tube is automatically made in software. The device automatically limits maximum furnace temperature when the fused silica tube is in place. A graphite system is also available, however temperature is limited to 1400°C to prevent interaction with Type S thermocouple.
Temperature Programming and Control
The system offers a user programmable mix of ramps, dwells, soaks, and printing rates, delayed start, repeat-cycle capability with a program capacity of 16 thermal cycles (64 segments), and the ability to store and recall frequently used programs. The temperature program is fully displayed and is editable during a run. All vital test parameters are continuously displayed and updated. Digital temperature control with optimized adaptive routines is used to achieve accurate sample, rather than furnace temperatures. Controlled heating rates up to 30°C/ min and uncontrolled rates up to 100°C/ min can be achieved.
Data Recording
Measured data is displayed in real time and is continuously stored on disk for further analysis. All test and program parameters along with system correction and standards data are also stored in each test data set for easy comparison tests at a later date.
System Correction and Calibration
Built-in system correction and calibration tables that can be verified or altered if desired are included. System correction can be altered, based on calibration runs with NIST standards or other references.
Data Reduction, Analysis, and Reporting
Stored data is automatically processed by statistical methods, for all points (such as with ramp heating, where applicable). The analysis includes polynomial curve fitting, and tabulation of results (such as percent expansion, average coefficient, and instantaneous coefficient, etc.) as a function of temperature. A variety of single or multiple curves for a group of tests can be generated, displayed, and hard copies produced using the printer.
|
 |
The extremely user-friendly, fully integrated, proprietary software (developed in C++ specifically for each instrument) is totally transparent to the user and requires no computer programming knowledge. Optionally, data files may be downloaded to other computers for further processing.
Safety and Diagnostic Features
Built-in safety provisions ensure that operational malfunctions will not cause catastrophic failure of the system or destruction of the sample. Loss of water flow, four levels of furnace and sample over-temperature, and dead computer detection are among the functions that are continuously monitored. Some will automatically shut down the equipment while others alert the operator via audio-visual indicators. Diagnostic routines allow the operator to exercise and interrogate the failed system to determine the cause. For Hydrogen purge the system is equipped with a built in leak detector for enhanced safety. |


